PowerVCF - Configure the Microsoft Certificate Authority for VMware Cloud Foundation Integration (Part 1)

This is the first of five blogs in a series that discusses Certificate Management with VMware Cloud Foundation. The series looks at the end to end process that you follow to take a freshly installed VMware Cloud Foundation platform (Management Domain) and replace the components with signed certificates using a Microsoft Certificate Authority.
In this post we will look at the configuration requirements on the Microsoft Certificate Authority server itself, failure to perform these additional configuration steps prior to attempting any procedures within the SDDC Manager User Interface or PowerVCF cmdlets will result in failures.
From a high level this involves performing the following prerequisite configuration tasks:
- Configure the Microsoft Certificate Authority for Basic Authentication
- Create and Add a Microsoft Certificate Authority Template
Configure the Microsoft Certificate Authority for Basic Authentication
Configure the Microsoft Certificate Authority for Certification Authority Web Enrollment and Basic Authentication, this is a requirement of SDDC Manager to allow it to talk to the Microsoft Certificate Authority to generate the signed certificates automatically.
Procedure
- Log in to the Active Directory server by using a Remote Desktop Protocol (RDP) client.
- Add Active Directory Certificate Services.
- Click Start > Run, enter ServerManager, and click OK.
- From the Dashboard, select Add roles and features.
- In the Before you begin dialog, click Next.
- In the Select installation type dialog, click Next.
- In the Select destination server dialog, click Next.
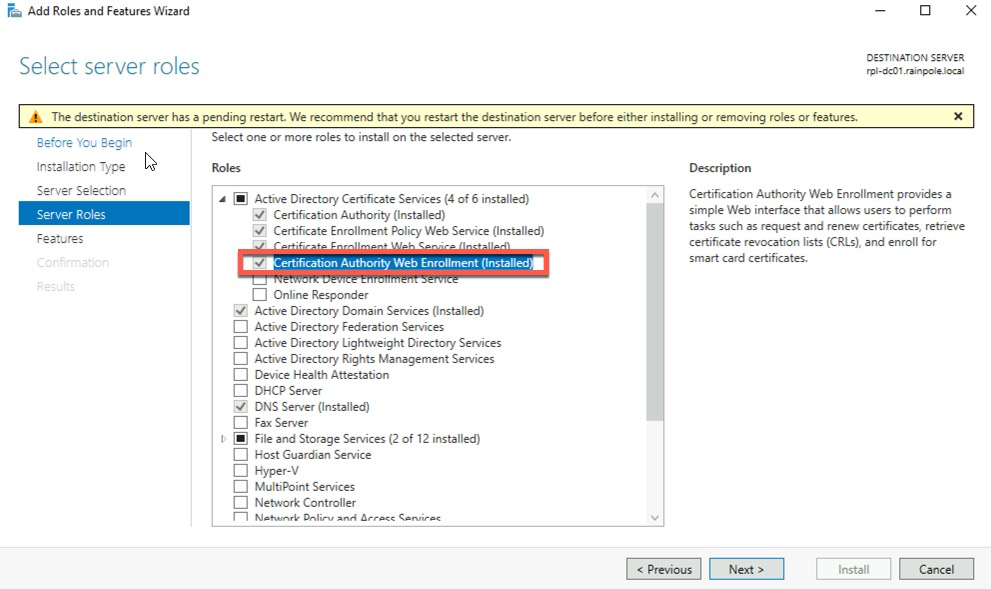
- In the Select server roles dialog.
- Expand Active Directory Certificate Services, select Certification Authority and Certification Authority Web Enrollment.

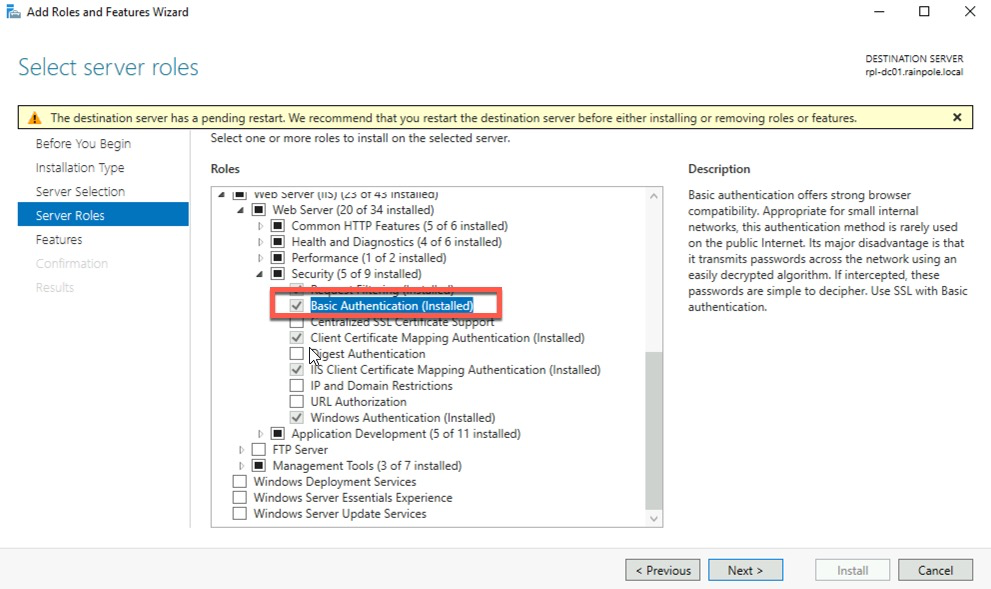
- Add Basic Authentication Feature to the Web Server (IIS).
- Expand Web Server (IIS) > Web Server > Security, select Basic Authentication.
- Click Next.

- In the Select features dialog, click Next.
- In the Confirm installation selections dialog, click Install.
Configure the Certificate Authority Web Service and all sites (including default web site) for basic authentication.
- Click Start > Run, enter Inetmgr.exe and click OK.
- Expand Server > Sites > Default Web Site, and select CertSrv.
- Under the IIS section double-click Authentication.
- Under the Authentication widow, right-click Basic Authentication and select Enable.
Restart the site to enable the basic authentication change.
- In the navigator select Default Web Site.
- In the Actions window, under Manage Website click Restart.
Create and Add a Microsoft Certificate Authority Template
Next we need to set up a Microsoft Certificate Authority template on the Active Directory (AD) server. The template contains the certificate authority (CA) attributes for signing certificates for the SDDC components. After you create the template, you add it to the certificate templates of the Microsoft Certificate Authority.
Procedure
- Log in to the Active Directory server by using a Remote Desktop Protocol (RDP) client.
- Click Start > Run, enter certtmpl.msc, and click OK.
- In the Certificate Template Console window, under Template Display Name, right-click Web Server and select Duplicate Template.
- In the Duplicate Template dialog box, and click OK.
- In the Properties of New Template dialog box, click the General tab.
- In the Template display name text box, enter VMware.
- Click the Extensions tab and configure the following.
- Select Application Policies and click Edit.
- Select Server Authentication, click Remove, and click OK.
- If present, select the Client Authentication policy, click Remove, and click OK.
- Select Key Usage and click Edit.
- Select the Signature is proof of origin (nonrepudiation) check box.
- Leave the defaults for all other options.
- Click OK.
- Click the Subject Name tab, ensure that the Supply in the request option is selected, and click OK to save the template.
- Add the new template to the certificate templates of the Microsoft CA.
- Click Start > Run, enter certsrv.msc, and click OK.
- In the Certification Authority window, expand the left pane, right-click Certificate Templates, and select New > Certificate Template to Issue.
- In the Enable Certificate Templates dialog box, select VMware, and click OK.
And there we have it, we've now configured the Microsoft Certificate Authority server with the required configuration changes to allow SDDC Manager the ability to connect and interact.
If you would like to learn more about VMware Cloud Foundation or PowerVCF, check out these links: